Configure GitHub Actions to use Terraform with OIDC and Entra ID Authentication
In this tutorial, I'll show you how to set up your environment for deploying Infrastructure as Code to Azure using Terraform in GitHub Actions without needing any secrets or keys. We will use OpenID Connect (OIDC) to connect to our Azure subscription and use the Entra ID for authorization against the Terraform backend.
Prerequisites
To complete this tutorial, you will need the following
- An Azure subscription
- A GitHub account
- Visual Studio Code, Azure CLI, GitHub CLI and JQ must be installed on your client.
- Basic knowledge of Terraform1 and GitHub Actions2
Introduction
I recently started using GitHub Actions with Terraform for Azure deployments and noticed that there are a number of tutorials that show how to set up a trust relationship via OIDC between GitHub Actions and Azure, but then use shared keys to authorize from the GitHub Actions workflows to the Terraform backend, more specifically an Azure Storage Account.
For some time now, Microsoft has recommended avoiding shared key authorization3 and using the Microsoft Entra as it provides more security and ease of use. In this tutorial we will set this up by following the steps below:
- Setup a new GitHub Repository
- Create a new Entra Application with SPN and federated identity credential
- Create the Terraform backend on Azure Storage Account and necessary Role Assignments
- Create a GitHub Actions Workflow and run a Terraform test deployment
Setup a new GitHub Repository
We start by setting up the GitHub repository, as we will need to use the information when we establish the trust relationship between our Entra ID tenant and GitHub by configuring the federated identity credential on the Entra application.
Below are the commands for setting up a new GitHub repository with gh cli. When we create the Entra application in the next step, we will set this repository as an entity type on the Federated Identity Credential4 and thus enable access to Azure from the created repository.
At the beginning of the code there are some variables that define the name of the repository and the local path to which we clone it. Please adapt these to the needs of your environment.
Start a bash shell on your client and execute the commands. Leave your bash session open, as the following script elements build upon each other and reuse the variables from the previous commands.
1
2
3
4
5
6
7
8
9
10
11
12
13
14
15
16
17
18
19
20
# Declare variables
repoName="terraform-gh-actions"
localPath="D:\Code\terraform\basic-getstarted"

# Authenticate to GitHub
gh auth login -w -p https

# Get GitHub username
userName=$(gh api user | jq -r '.login')

# Create a new repository and adding Terraform gitignore
gh repo create $repoName --public --gitignore Terraform

# Clone the repository to your workstation
cd $localPath
git clone https://github.com/$userName/$repoName.git

# Open the repository in Visual Studio Code
cd $repoName
code .
Our repository is now ready for use.

Create a new Entra Application with SPN and federated identity credential
The next step to enable the login to Azure via OIDC in a GitHub Actions workflow is to create an Entra application with a Service Principal Name (SPN) and a federated identity credential to trust the tokens that are issued by the GitHub Actions5.
Below you will find the commands for configuring the Entra application. Again, customize the variables at the beginning of the script that are used to define the name of the Microsoft Entra application and your Azure subscription ID.
You can either login from your client using az login or navigate to https://shell.azure.com and use the Cloud Shell.
1
2
3
4
5
6
7
8
9
10
11
12
13
14
15
16
17
18
19
20
21
22
23
24
25
26
27
28
29
30
31
32
33
34
35
36
# Declare variables
appName="spn-github-actions"
azSubscriptionId="00000000-0000-0000-0000-000000000000"
# Create Entra ID Application
app=$(az ad app create --display-name $appName)
appId=$(echo $app | jq -r .appId)
# Create Service Principal for the Entra ID application
sp=$(az ad sp create --id $appId)
# Extract the client ID and the object ID from the Service Principal as well as the tenant ID
clientId=$(echo $sp | jq -r .appId)
objectId=$(echo $sp | jq -r .id)
tenantId=$(az account show --subscription $azSubscriptionId --query tenantId --output tsv)
# Update Service Principal to enforce Role Assignment
az ad sp update --id $objectId --set "appRoleAssignmentRequired=true"
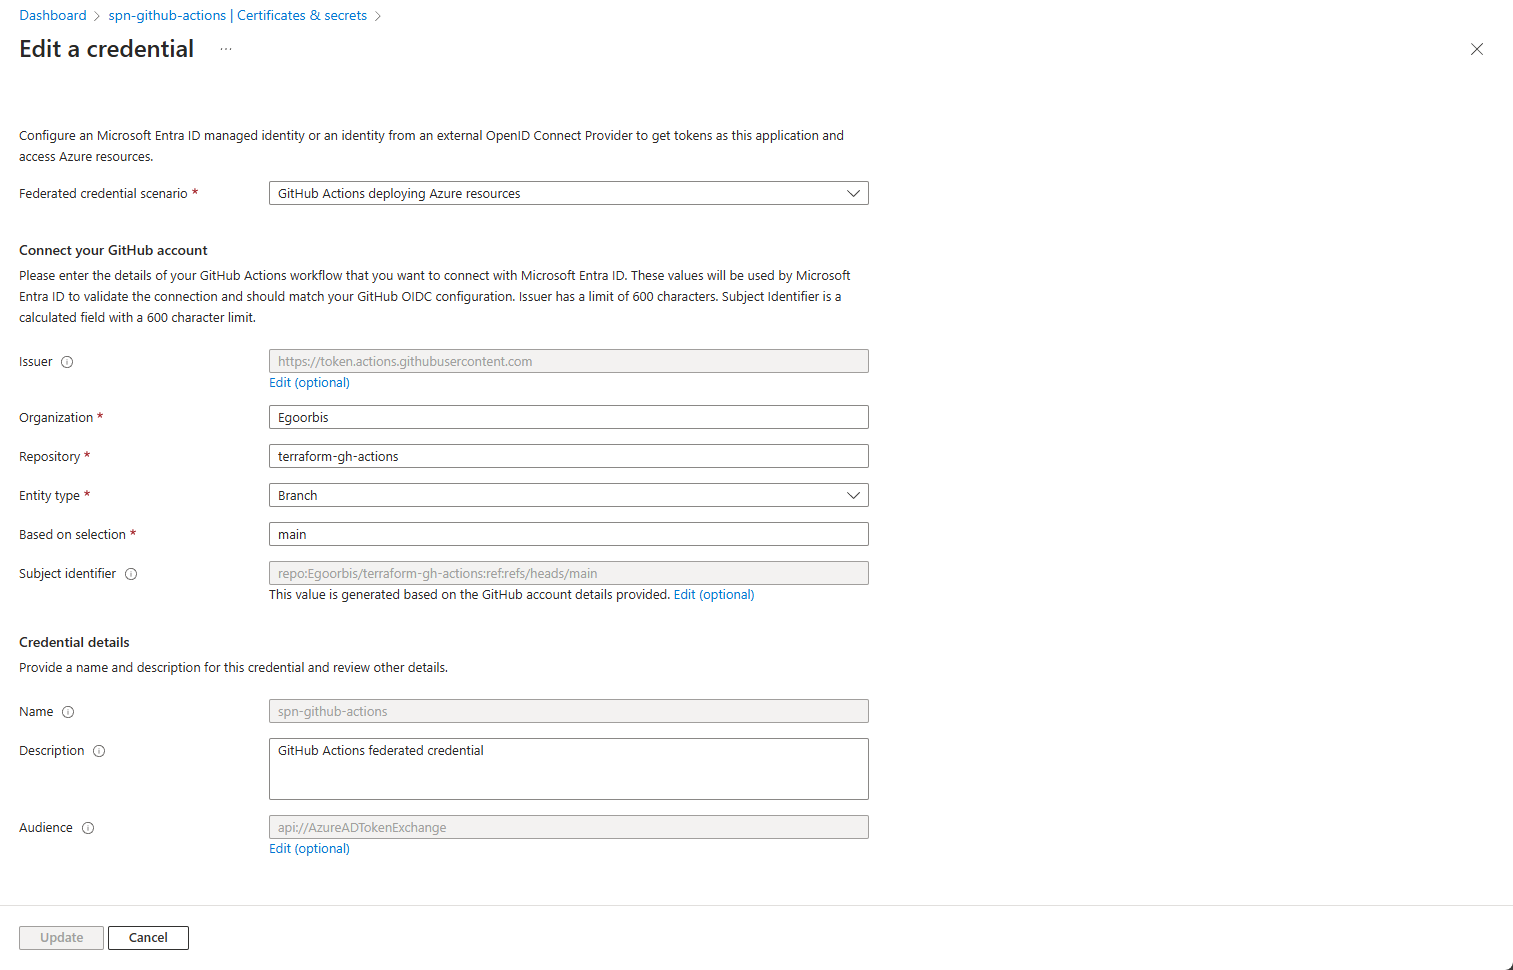
## Add federated credential to Entra ID Application by pointing the subject to the main branch of the new respository created under your GitHub account
az ad app federated-credential create --id $clientId --parameters "{
\"name\": \"$appName\",
\"issuer\": \"https://token.actions.githubusercontent.com\",
\"subject\": \"repo:$userName/$repoName:ref:refs/heads/main\",
\"description\": \"GitHub Actions federated credential\",
\"audiences\": [
\"api://AzureADTokenExchange\"
]
}"
# Output the IDs
echo "{
\"clientId\": \"$clientId\",
\"tenantId\": \"$tenantId\",
\"subscriptionId\": \"$azSubscriptionId\"
}" | jq
Save the output, as we will need the corresponding IDs later to save them in the repository as secrets.
If you now navigate to https://portal.azure.com - Microsoft Entra ID - App registrations, you will find the created spn-github-actions, in which the federated credential is configured under the menu item Certificates & secrets.
Create the Terraform backend on Azure Storage Account and necessary Role Assignments
Terraform uses a state file6 to store information about your infrastructure and its configuration. A common practice when using Azure is to store the state file on an Azure Storage Account.
Using the following commands we will create a resource group and storage account on our Azure subscription. To be able to create the container directly as part of this bootstrapping script, we will leave the shared keys enabled when creating the storage account and disable them immediately after creating the container that we will use for our Terraform deployment.
We then need to create two Azure RBAC role assignments for the SPN so that we can successfully write the state file and Azure resources using Terraform:
- Storage Blob Data Contributor on the storage account for the purpose of Entra ID authorization on the Terraform backend.
- Contributor on the subscription to subsequently create resources via GitHub Actions workflows.
[!IMPORTANT] In a productive environment, it is recommended to use the least privilege model and to grant the SPN only those authorizations that are actually required to perform the intended tasks.
1
2
3
4
5
6
7
8
9
10
11
12
13
14
15
16
17
18
19
20
21
22
23
24
25
26
27
28
29
30
31
# Declare variables
randomString=$(head /dev/urandom | tr -dc a-z0-9 | head -c 6 ; echo '')
resourceGroup="rg-tfremotestate-1"
location="Sweden Central"
storageAccountName="sttfremotestate$randomString"
containerName="tfremote-state"

# Create Azure Resource Group
az group create --name $resourceGroup --location "$location"

# Create Azure Storage Account with shared key access enabled
az storage account create --name $storageAccountName --resource-group $resourceGroup --location "$location" --sku Standard_LRS --kind StorageV2 --allow-blob-public-access false --min-tls-version TLS1_2

# Create the Container for our remote state
az storage container create --name $containerName --account-name $storageAccountName --auth-mode login

# Update the Storage Account to disable shared key access
az storage account create --name $storageAccountName --resource-group $resourceGroup --allow-shared-key-access false

# Assign the "Storage Blob Data Contributor" role to the service principal to the terraform
az role assignment create --assignee $clientId --role "Storage Blob Data Contributor" --scope "subscriptions/$azSubscriptionId/resourceGroups/$resourceGroup/providers/Microsoft.Storage/storageAccounts/$storageAccountName"

# Assign the "Contributor" role to the service principal on Subscription Level
az role assignment create --assignee $clientId --role "Contributor" --scope "subscriptions/$azSubscriptionId/"

# Display the backend configuration
echo "{
  \"resourceGroup\": \"$resourceGroup\",
  \"storageAccountName\": \"$storageAccountName\",
  \"containerName\": \"$containerName\"
}" | jq
Save this output as well, as we will also save this information as secrets in the repository in the next step.
Create GitHub Actions Workflow and run a test deployment
GitHub Actions2 uses workflows in the yaml file format, which are stored in the .github/workflows directory in the corresponding repository.
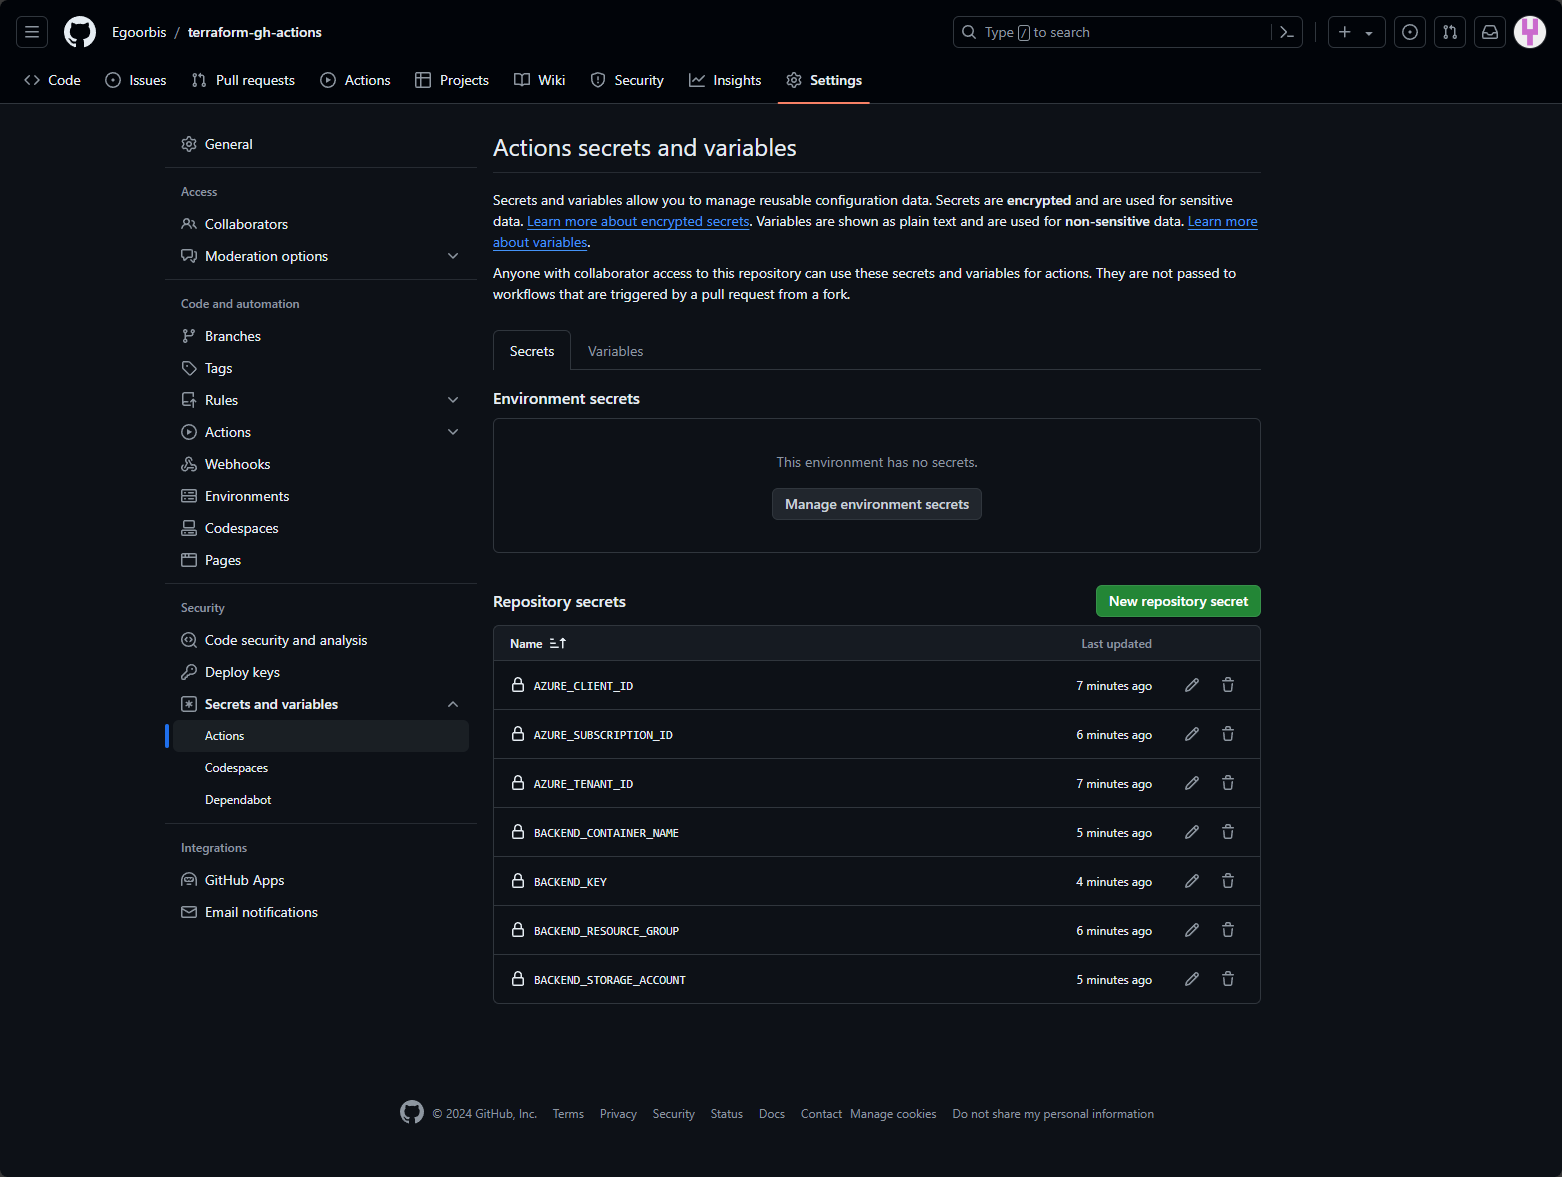
Before we start configuring the workflow, we take our outputs from the previous commands and add them to the repository as secrets7.
Configure GitHub Actions secrets
To do this, navigate to https://github.com and select your newly created repository. Go to Settings, then under Security expand the Secrets and variables option and then select Actions. You now need to add all secrets as shown below:
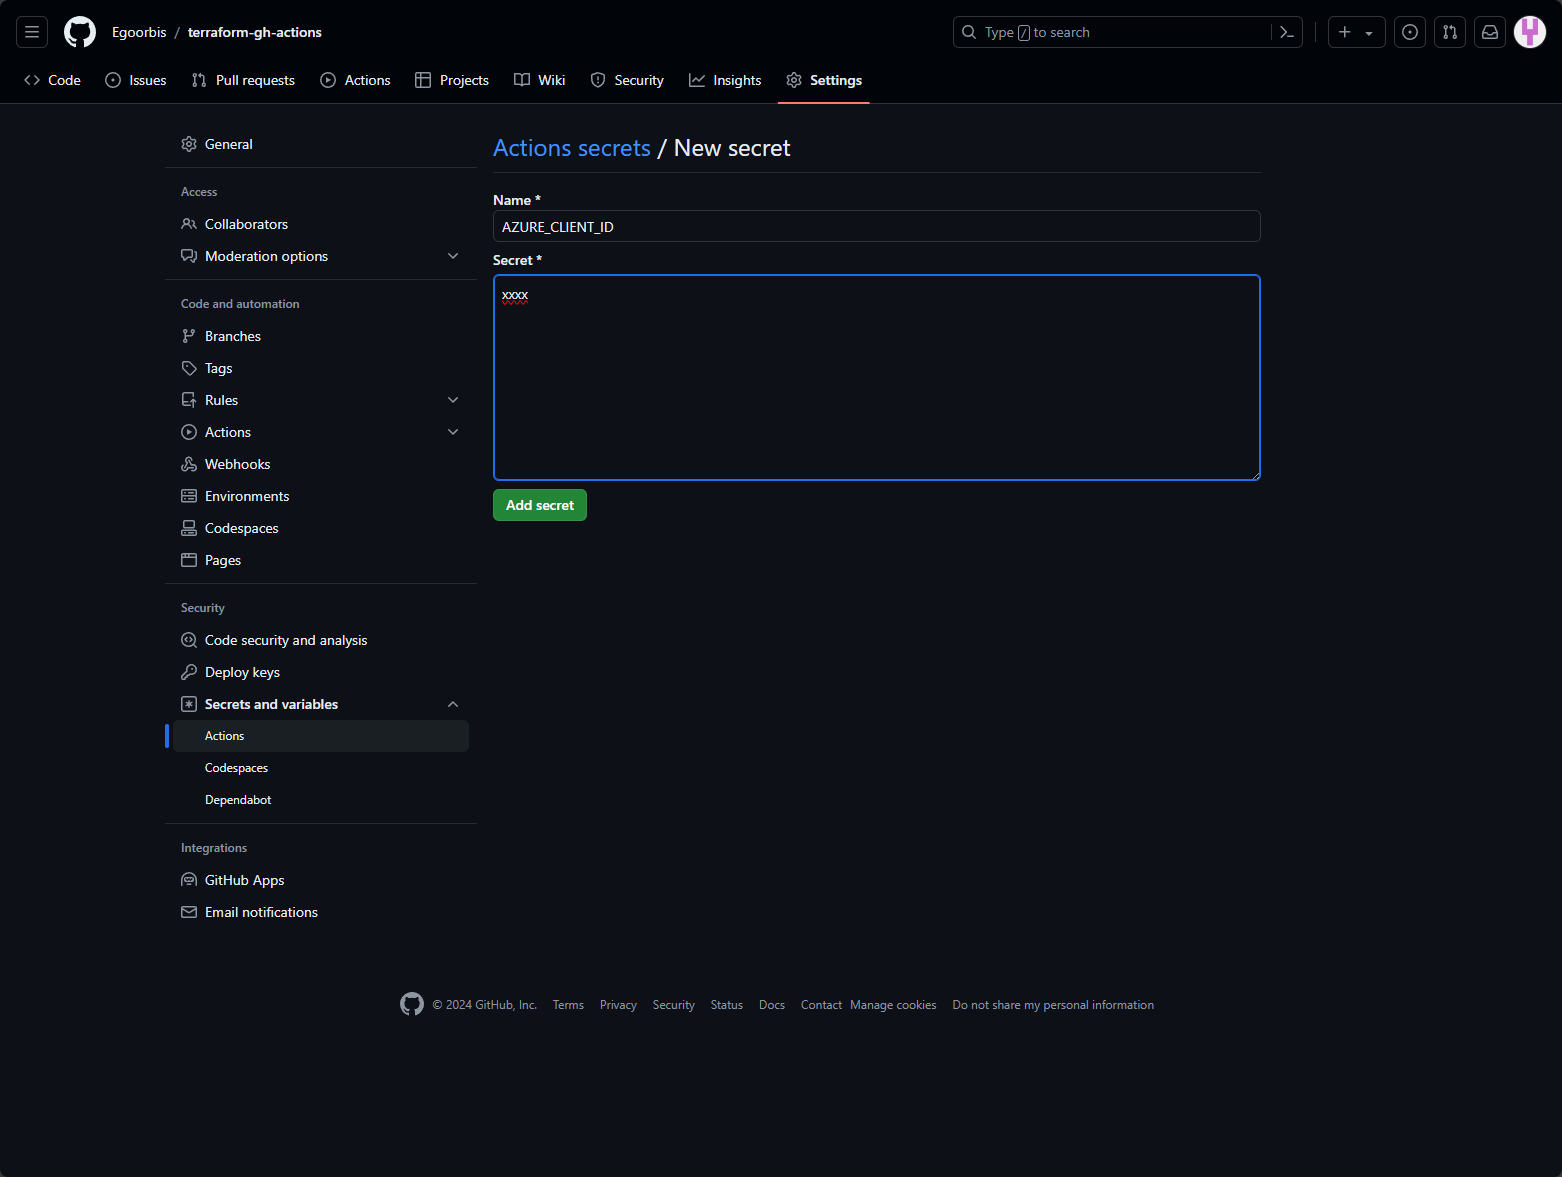
| Secret Name | Value |
|---|---|
| AZURE_CLIENT_ID | Entra Application Client ID |
| AZURE_SUBSCRIPTION_ID | Azure Subscription ID |
| AZURE_TENANT_ID | Entra Tenant ID |
| BACKEND_RESOURCE_GROUP | Resource Group Name of the Backend Storage Account |
| BACKEND_STORAGE_ACCOUNT | Name of the Backend Storage Account |
| BACKEND_CONTAINER_NAME | Name of the Backend Storage Account Blob Container |
| BACKEND_KEY | Name of the State File that will be stored in the Container, e. .g terraform.tfstate |
With this we are ready to configure our workflows.
Configure OIDC Authentication
To be able to retrieve the token, the workflow must be granted the id-token: write permissions. The contents: read permission is required to for actions and checkouts. Both GitHub8 and Microsoft5 provide detailed descriptions of how to setup the OIDC authentication and a sample workflow to test the login using Azure CLI.
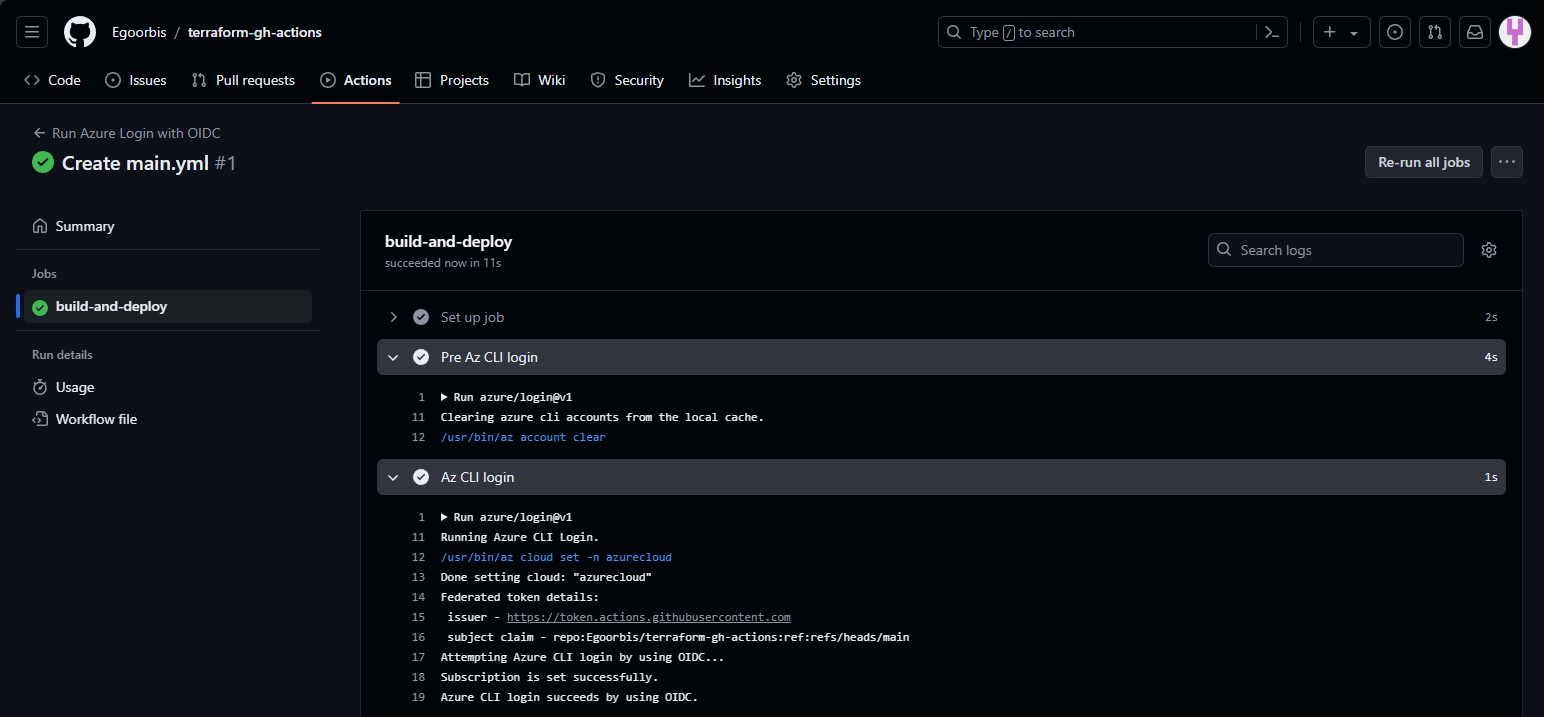
You can use the example workflow and place it as a yaml file in the .github/workflows directory. Once you have transferred the workflow to your repository, you can start the workflow on the Actions tab of your repository,
You should see a successful login as part of the Az CLI Login step if your run was successful.
Create a GitHub Actions Workflow and run a Terraform test deployment
The final step now is to also test access to the state file and create resources in Azure using Terraform. We will use a simple Terraform file which only creates a new resource group.
In your repository, create a new directory called tf and create a main.tf file in it with the below content.

Make sure that the arguments use_azuread_auth and use_oidc are configured in the backend block and use_oidc as well in the provider block.
1
2
3
4
5
6
7
8
9
10
11
12
13
14
15
16
17
18
19
20
21
22
terraform {
  backend "azurerm" {
    use_azuread_auth = true
    use_oidc         = true
  }
  required_providers {
    azurerm = {
      source  = "hashicorp/azurerm"
      version = ">= 3.104.0"
    }
  }
}

provider "azurerm" {
  features {}
  use_oidc = true
}

resource "azurerm_resource_group" "rg-gha" {
  name     = "rg-terraform-github-actions"
  location = "Sweden Central"
}
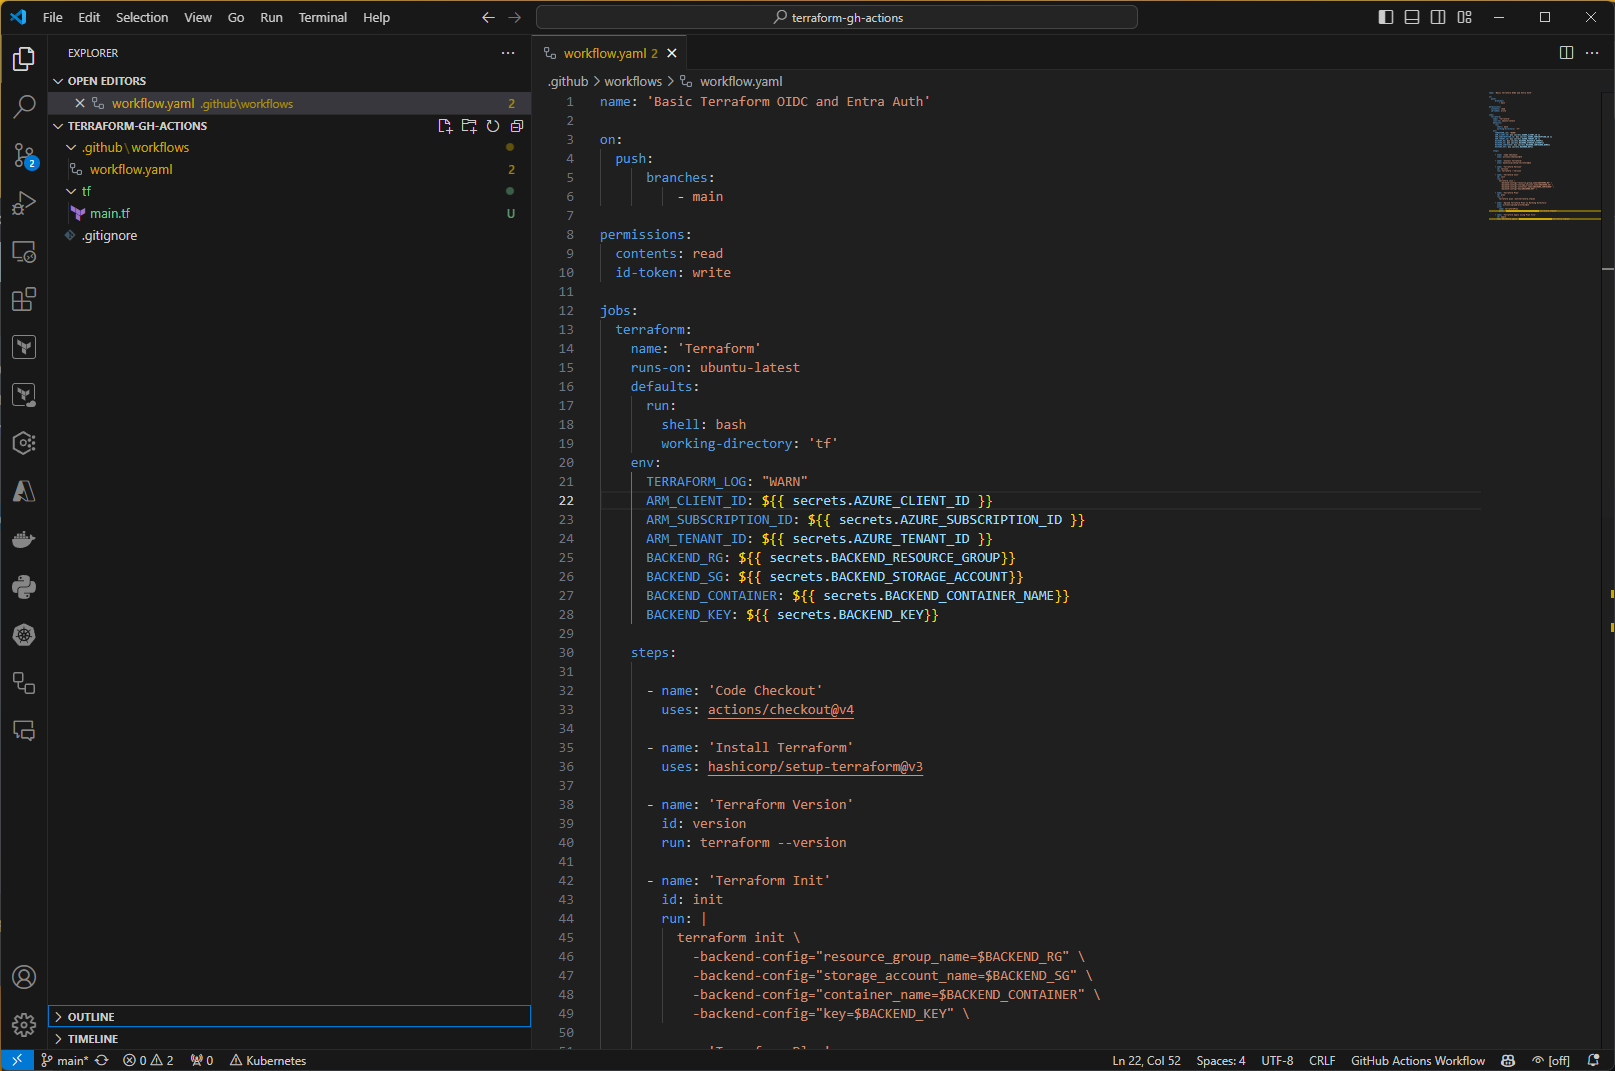
With that, we are now ready to create our GitHub Actions workflow that will run our desired Terraform deployment. Create the required directory structure *.github/workflows. In this directory, create a file workflow.yaml with the content below. Then push the changes to GitHub.
[!NOTE] For the sake of simplicity, we will push directly to the main branch in this tutorial. In a production environment, you should never push directly to the main branch, but use branch protection and pull requests to merge your changes.
Using the workflow below, we can finally execute our Terraform deployment, let’s break it down:
- The first part contains the name and the on trigger. In our example, the workflow is triggered by a push to the main branch.
- Next, we specify the required permissions for OIDC and actions/checkouts.
- In the jobs part, we specify the environment our workflow runs-on and point the working-directory to our tf directory. In the env part, we specify information that our runner needs, such as the Terraform log level and our secrets that we use throughout the workflow.
- Finally, we define the steps of our workflow by running the checkout, installing terraform and finally running through the common terraform init-plan-apply steps.
As you can see we pass our environment variables to the Terraform Init step to point to our backend.
1
2
3
4
5
6
7
8
9
10
11
12
13
14
15
16
17
18
19
20
21
22
23
24
25
26
27
28
29
30
31
32
33
34
35
36
37
38
39
40
41
42
43
44
45
46
47
48
49
50
51
52
53
54
55
56
57
58
59
60
61
62
63
name: 'Basic Terraform OIDC and Entra Auth'

on:
  push:
      branches:
          - main

permissions:
  contents: read
  id-token: write

jobs:
  terraform:
    name: 'Terraform'
    runs-on: ubuntu-latest
    defaults:
      run:
        shell: bash
        working-directory: 'tf'
    env:
      TERRAFORM_LOG: "WARN"
      ARM_CLIENT_ID: $
      ARM_SUBSCRIPTION_ID: $
      ARM_TENANT_ID: $
      BACKEND_RESOURCE_GROUP: $
      BACKEND_STORAGE_ACCOUNT: $
      BACKEND_CONTAINER_NAME: $
      BACKEND_KEY: $

    steps:
      - name: 'Code Checkout'
        uses: actions/checkout@v4

      - name: 'Install Terraform'
        uses: hashicorp/setup-terraform@v3

      - name: 'Terraform Version'
        id: version
        run: terraform --version

      - name: 'Terraform Init'
        id: init
        run: |
          terraform init \
            -backend-config="resource_group_name=$BACKEND_RESOURCE_GROUP" \
            -backend-config="storage_account_name=$BACKEND_STORAGE_ACCOUNT" \
            -backend-config="container_name=$BACKEND_CONTAINER_NAME" \
            -backend-config="key=$BACKEND_KEY" \

      - name: 'Terraform Plan'
        id: plan
        run: |
          terraform plan -out=terraform.tfplan

      - name: 'Upload Terraform Plan to Working Directory'
        uses: actions/upload-artifact@v4
        with:
          name: terraformPlan
          path: "terraform.tfplan"

      - name: 'Terraform Apply using Plan File'
        id: apply
        run: terraform apply terraform.tfplan
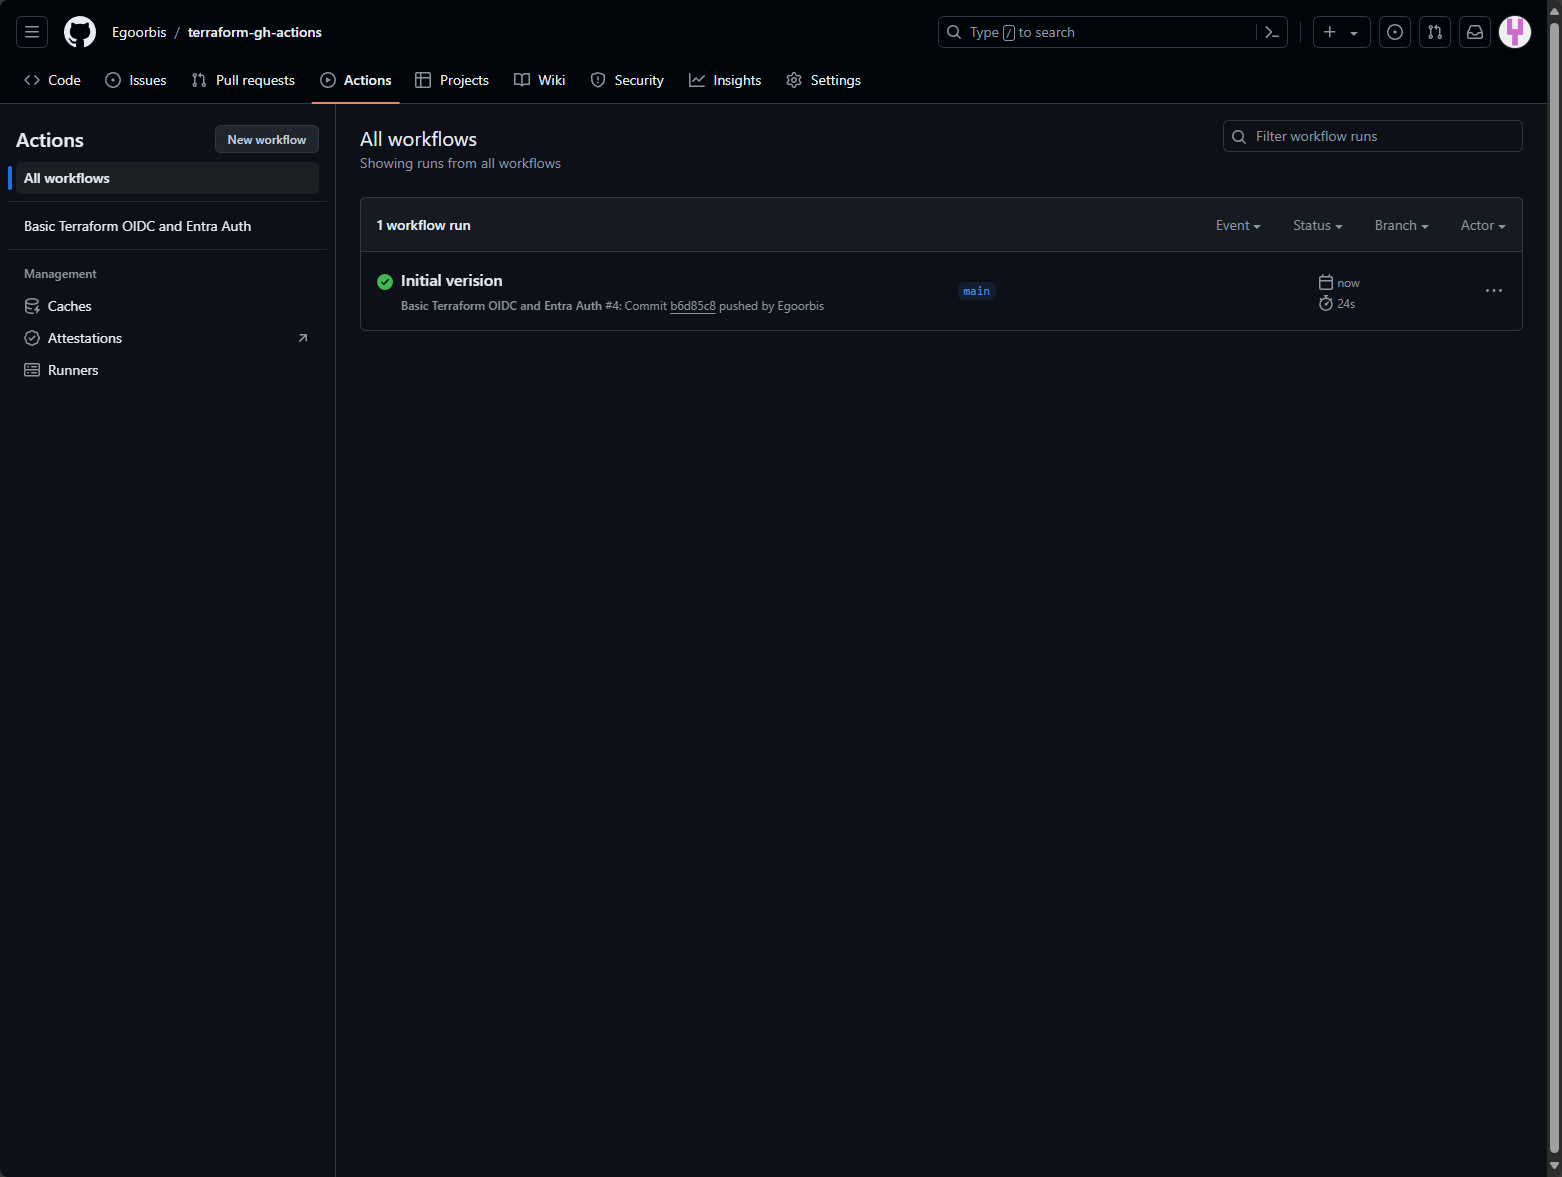
Under the Actions tab of your repository you’ll see that the workflow was automatically started.
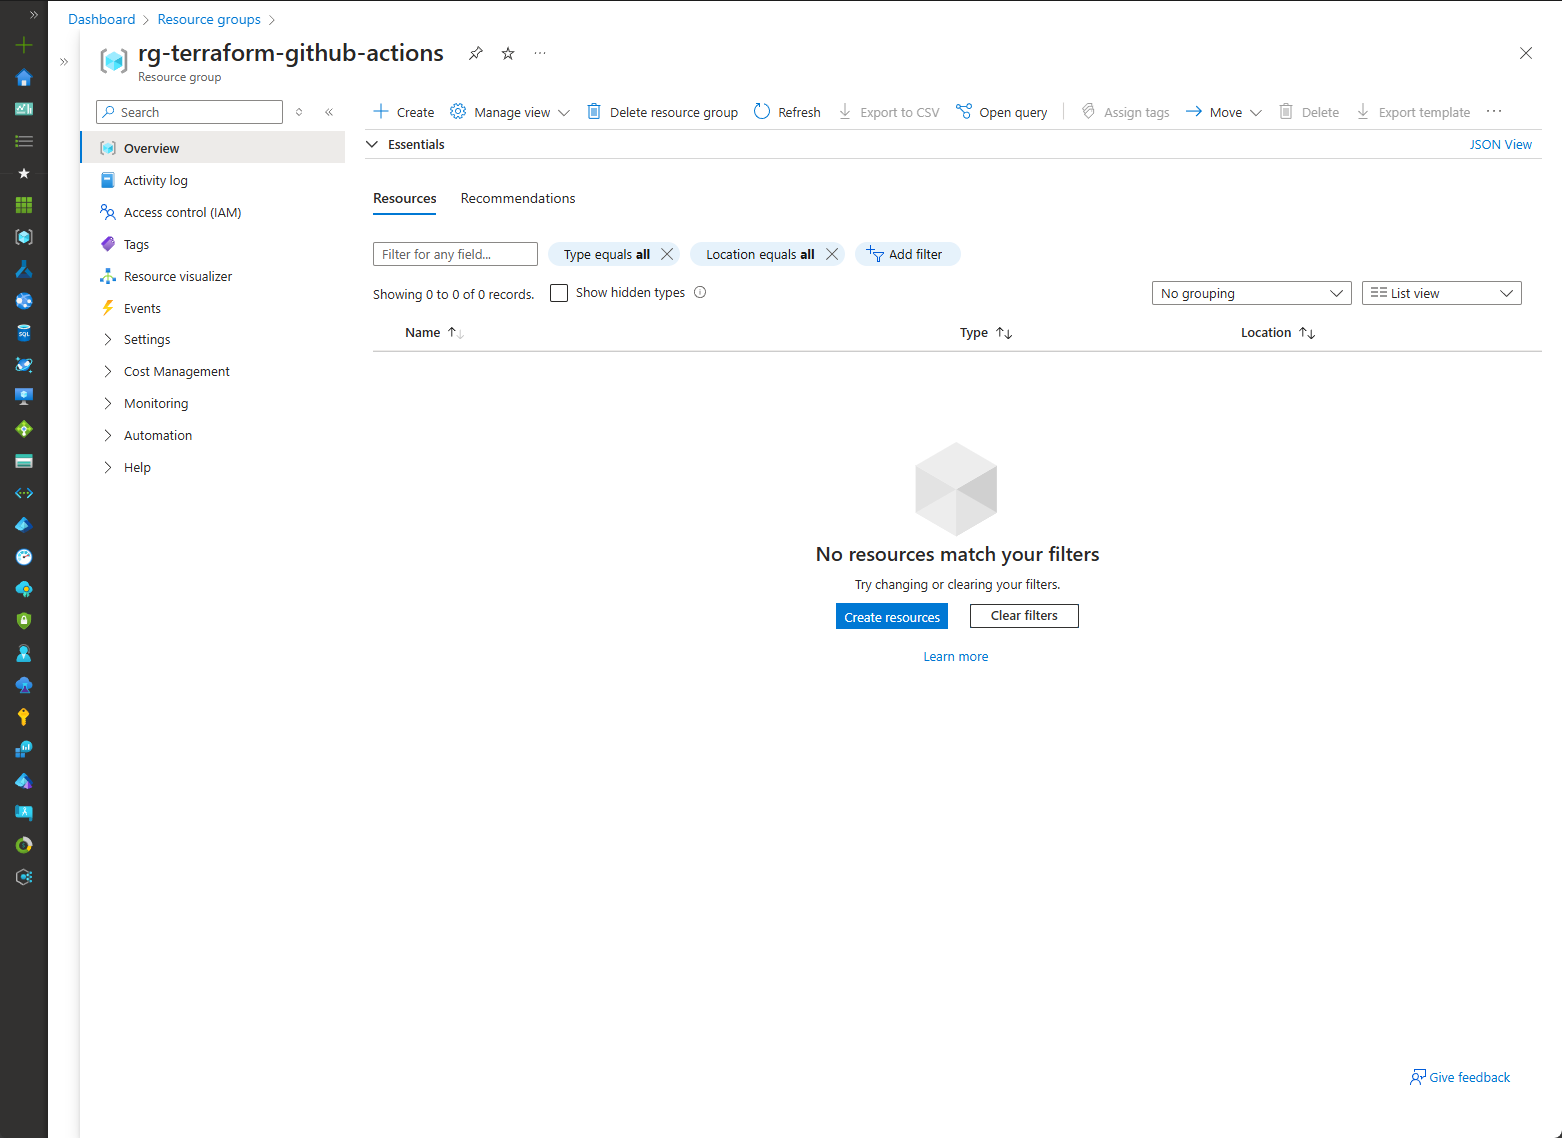
After a successful run, you will see that your resource group has been created in Azure.
Wrapping up
With this article we have created a new GitHub repository and established an initial connection between GitHub Actions and Azure and configured a Terraform backend. Thanks to the use of OIDC and Entra Authorization, we have created an environment that works purely token-based.
This tutorial illustrates a basic setup upon which more advanced workflows can be implemented.