Deploying a Cilium-Powered BYO-CNI AKS Cluster with Terraform
Want to take full control of your AKS networking and leverage the advanced features of Cilium? This tutorial will walk you through the process of deploying a custom Cilium-powered AKS cluster using Terraform. By bringing your own CNI (BYO-CNI), you gain the flexibility to customize your networking and fine-tune your cluster's behavior. I'll guide you through the steps of setting up Cilium as the CNI provider by leveraging Terraform's and Helm's power to automate the deployment process.
Prerequisites
- Azure Subscription: You’ll need an active Azure subscription to create and manage the AKS cluster.
- Basic Knowledge of Terraform: Familiarity with Terraform’s syntax, modules, and state management is essential for this tutorial. If you’re new to Terraform, consider going through the official documentation or online tutorials to get started1.
- Tooling: You’ll need an Integrated Development Environment (IDE) like Visual Studio Code or IntelliJ IDEA, along with the Azure CLI and Terraform to manage your code and interact with cloud resources.
Note: All the code used in this article is available on GitHub.
Introduction
Azure Kubernetes Service (AKS) offers a wide range of networking options through various Container Networking Interface (CNI) plugins. Each plugin caters to specific needs and comes with its own set of features. For a detailed breakdown of these options, refer to the official documentation2.
While Azure Kubernetes Service (AKS) offers built-in CNI solutions, you have the freedom to bring your own CNI (BYO-CNI) to unlock advanced networking capabilities. Cilium is one such powerful CNI, renowned for its robust features and performance.
Microsoft offers a streamlined option, Azure CNI Powered by Cilium3, which blends the familiar Azure CNI with select Cilium features. This provides a good balance of functionality and ease of use. However, for those seeking maximum flexibility and control, deploying the full Cilium as a BYO-CNI is the way to go.
In this blog post, we’ll embark on building a custom AKS cluster with Cilium using Terraform and Helm. This powerful combination empowers you to craft a network configuration tailored precisely to your needs.
Note: This blog post will focus on using the OSS (Open Source Software) version of Cilium for deploying a custom AKS cluster.
Setting Up Your Toolkit
Before we dive into the deployment, let’s ensure we have the necessary tools in place.
Cilium CLI
The Cilium CLI is a valuable tool for interacting with and monitoring your Cilium installation within the cluster. You can download it from the official releases on GitHub4.
Kubelogin
Since we’ll be enabling Entra ID authentication for our AKS cluster and disabling local accounts, we’ll need kubelogin to authenticate with the cluster when using Helm. You can download kubelogin from the official Kubernetes releases page5.
Alternative Installation Methods:
Both the Cilium CLI and kubelogin can also be installed using package managers like Chocolatey or winget. If you prefer using these methods, refer to their respective documentation for installation instructions.
Preparing the Terraform Configuration
Let’s set up our Terraform configuration. Create a new directory and a data.tf file to define the necessary data sources. This file will fetch essential information for our deployment. Here’s what we’ll include:
azurerm_client_config: Retrieves your Azure client configuration, including your tenant and subscription IDs, for proper authentication.azuread_service_principal: Retrieves information about the Entra ID Service Principal associated with the Azure Kubernetes Service AAD Server. This is crucial forkubeloginauthentication to the cluster.azurerm_kubernetes_cluster: Fetches details about your AKS cluster. We’ll use this information later to interact with the cluster when deploying Cilium through Helm.
1
2
3
4
5
6
7
8
9
10
data "azurerm_client_config" "current" {}

data "azuread_service_principal" "aks-aad-server" {
  display_name = "Azure Kubernetes Service AAD Server"
}

data "azurerm_kubernetes_cluster" "aks" {
  name                = azurerm_kubernetes_cluster.aks.name
  resource_group_name = azurerm_resource_group.aks-rg.name
}
Next, create a providers.tf file to configure the Terraform providers:
azurerm: Allows Terraform to deploy Azure resources.
helm: Allows Terraform to manage Helm charts for deploying applications to our AKS cluster. We’ll use this to install Cilium. The provider useskubeloginto obtain an access token for the cluster, referencing data sources and a service principal that we’ll create during our deployment.
1
2
3
4
5
6
7
8
9
10
11
12
13
14
15
16
17
18
19
20
21
22
23
24
25
26
27
28
29
30
31
32
33
34
35
36
37
38
39
40
41
42
43
44
45
46
47
48
49

terraform {
  required_providers {
    azurerm = {
      source  = "hashicorp/azurerm"
      version = "~> 3.71"
    }

    helm = {
      source  = "hashicorp/helm"
      version = "2.15.0"
    }

    kubernetes = {
      source  = "hashicorp/kubernetes"
      version = "2.4.1"
    }
  }
}

provider "azurerm" {
  features {}
}

provider "helm" {
  kubernetes {
    host                   = data.azurerm_kubernetes_cluster.aks.kube_config.0.host
    cluster_ca_certificate = base64decode(data.azurerm_kubernetes_cluster.aks.kube_config.0.cluster_ca_certificate)
    exec {
      api_version = "client.authentication.k8s.io/v1beta1"
      command     = "kubelogin"
      args = [
        "get-token",
        "--login",
        "spn",
        "--environment",
        "AzurePublicCloud",
        "--tenant-id",
        data.azurerm_client_config.current.tenant_id,
        "--server-id",
        data.azuread_service_principal.aks-aad-server.client_id,
        "--client-id",
        azuread_service_principal.aks_spn.client_id,
        "--client-secret",
        azuread_service_principal_password.aks_spn_password.value
      ]
    }
  }
}
Deploying the AKS Cluster and Supporting Resources
With our data.tf and providers.tf files in place, we can now prepare our main.tf we’ll use to deploy the resources. This includes Entra ID objects, the virtual network, the cluster itself, and a few supporting components.
Entra ID objects
Before we create the AKS cluster, let’s set up an Entra ID group to manage AKS administrators. This group will be used to enable Entra ID integration for the cluster, allowing us to:
- Centralize access control: Manage cluster access through Entra ID, simplifying user and permission management.
- Enhance security: Disable local accounts within the cluster, ensuring all access is governed by Entra ID.
We’ll also create a new service principal for authenticating to the cluster with our Helm provider. Finally, we’ll add our user and the service principal to the aks-admins Entra ID group.
1
2
3
4
5
6
7
8
9
10
11
12
13
14
15
16
17
18
19
20
21
22
23
24
25
26
27
28
29
resource "azuread_group" "aks-admins-group" {
  display_name     = "aks-admins"
  security_enabled = true
}

resource "azuread_application" "aks_app" {
  display_name            = "aks-app"
  owners                  = [data.azurerm_client_config.current.object_id]
  prevent_duplicate_names = true
}

resource "azuread_service_principal" "aks_spn" {
  client_id = azuread_application.aks_app.client_id
}

resource "azuread_service_principal_password" "aks_spn_password" {
  service_principal_id = azuread_service_principal.aks_spn.id
  end_date             = "2024-12-01T00:00:00Z"
}

resource "azuread_group_member" "aks-admins" {
  for_each = {
    user = data.azurerm_client_config.current.object_id
    spn  = azuread_service_principal.aks_spn.id
  }

  group_object_id  = azuread_group.aks-admins-group.id
  member_object_id = each.value
}
Resource Group and Naming
We’ll use the Azure naming module to generate consistent and unique names for our resources. This helps to avoid naming conflicts and improves the organization of our infrastructure.
1
2
3
4
5
6
7
8
9
module "naming" {
  source  = "Azure/naming/azurerm"
  version = "~> 0.4.1"
}

resource "azurerm_resource_group" "aks-rg" {
  name     = module.naming.resource_group.name_unique
  location = "switzerlandnorth"
}
Virtual Network
Next, we’ll deploy the network infrastructure for our AKS cluster. This includes network security groups (NSGs) and a virtual network with two subnets. To streamline our deployment and ensure best practices, we’ll leverage Azure Verified Modules (AVMs) for Terraform. AVMs provide pre-built, tested, and secure modules that significantly reduce the time and effort required to manage infrastructure6.
1
2
3
4
5
6
7
8
9
10
11
12
13
14
15
16
17
18
19
20
21
22
23
24
25
26
27
28
29
30
31
32
33
34
35
module "avm-res-network-networksecuritygroup" {
  count               = 2
  source              = "Azure/avm-res-network-networksecuritygroup/azurerm"
  version             = "0.2.0"
  resource_group_name = azurerm_resource_group.aks-rg.name
  name                = "${module.naming.network_security_group.name}-${count.index}"
  location            = azurerm_resource_group.aks-rg.location
}


module "avm-res-network-virtualnetwork" {
  source              = "Azure/avm-res-network-virtualnetwork/azurerm"
  version             = "0.4.0"
  location            = azurerm_resource_group.aks-rg.location
  resource_group_name = azurerm_resource_group.aks-rg.name
  name                = module.naming.virtual_network.name_unique

  address_space = ["10.11.0.0/16"]
  subnets = {
    subnet0 = {
      name             = "${module.naming.subnet.name_unique}0"
      address_prefixes = ["10.11.0.0/24"]
      network_security_group = {
        id = module.avm-res-network-networksecuritygroup[0].resource_id
      }
    }
    subnet1 = {
      name             = "${module.naming.subnet.name_unique}1"
      address_prefixes = ["10.11.1.0/24"]
      network_security_group = {
        id = module.avm-res-network-networksecuritygroup[1].resource_id
      }
    }
  }
}
User-Assigned Managed Identity
Next, we’ll create a user-assigned managed identity and assign it the “Network Contributor” role. This allows the AKS cluster to manage network resources.
1
2
3
4
5
6
7
8
9
10
11
12
13
14
15
16
17
18
19
module "avm-res-managedidentity-userassignedidentity" {
  source              = "Azure/avm-res-managedidentity-userassignedidentity/azurerm"
  version             = "0.3.3"
  name                = module.naming.user_assigned_identity.name_unique
  location            = azurerm_resource_group.aks-rg.location
  resource_group_name = azurerm_resource_group.aks-rg.name
}

module "avm-res-authorization-roleassignment" {
  source  = "Azure/avm-res-authorization-roleassignment/azurerm"
  version = "0.1.0"
  role_assignments_azure_resource_manager = {
    "aks" = {
      principal_id         = module.avm-res-managedidentity-userassignedidentity.principal_id
      role_definition_name = "Network Contributor"
      scope                = azurerm_resource_group.aks-rg.id
    }
  }
}
AKS
Finally, we’ll deploy the AKS cluster with below configuration. The key points are:
- No Network Profile: We’re explicitly setting ?
network_plugin = "none"in order to configure Cilium in the following section. - Entra ID Integration: We’re enabling Entra ID integration and assigning the previously declarated
aks-adminsgroup as the administrator group. - User-Assigned Managed Identity: The cluster is assigned the previously declarated user-assigned managed identity.
- Dependencies: The
depends_onmeta-argument ensures that the role assignment for the managed identity is created before the AKS cluster. - Ignore Node Count: Since we’re enabling autoscaling for the node pool, we want Terraform to ignore changes to the
node_countattribute. This allows the autoscaler to manage the number of nodes based on the workload demands without interference from Terraform.
1
2
3
4
5
6
7
8
9
10
11
12
13
14
15
16
17
18
19
20
21
22
23
24
25
26
27
28
29
30
31
32
33
34
35
36
37
38
39
40
41
42
43
44
45
46
47
48
49
50
51
52
resource "azurerm_kubernetes_cluster" "aks" {
  name                              = module.naming.kubernetes_cluster.name_unique
  location                          = azurerm_resource_group.aks-rg.location
  resource_group_name               = azurerm_resource_group.aks-rg.name
  dns_prefix                        = "cilium-aks"
  sku_tier                          = "Free"
  azure_policy_enabled              = true
  oidc_issuer_enabled               = true
  workload_identity_enabled         = true
  local_account_disabled            = true
  role_based_access_control_enabled = true

  default_node_pool {
    name                   = "systempool"
    enable_auto_scaling    = true
    enable_host_encryption = true
    node_count             = 1
    min_count              = 1
    max_count              = 3
    vm_size                = "Standard_DS2_v2"
    vnet_subnet_id         = module.avm-res-network-virtualnetwork.subnets["subnet0"].resource_id
    upgrade_settings {
      max_surge                     = "10%"
      drain_timeout_in_minutes      = 0
      node_soak_duration_in_minutes = 0
    }
  }

  identity {
    type         = "UserAssigned"
    identity_ids = [module.avm-res-managedidentity-userassignedidentity.resource_id]
  }

  network_profile {
    network_plugin = "none"
  }

  lifecycle {
    ignore_changes = [default_node_pool[0].node_count]
  }

  depends_on = [
    module.avm-res-authorization-roleassignment
  ]

  azure_active_directory_role_based_access_control {
    azure_rbac_enabled     = true
    managed                = true
    admin_group_object_ids = [azuread_group.aks-admins-group.id]
    tenant_id              = data.azurerm_client_config.current.tenant_id
  }
}
Deploying Cilium
The final step is to deploy Cilium to our AKS cluster. We’ll accomplish this using a Helm release, which provides a streamlined way to install and manage applications on Kubernetes. For detailed configuration options, consult the Cilium documentation or the Cilium package documentation7.
Warning: As stated in the Cilium documentation, make sure that you set a cluster pool IPAM pod CIDR that does not overlap with the service CIDR of the AKS through the
ipam.operator.clusterPoolIPv4PodCIDRListoption.
1
2
3
4
5
6
7
8
9
10
11
12
13
14
15
16
17
18
19
20
21
22
23
24
resource "helm_release" "cilium" {
  name       = "cilium"
  repository = "https://helm.cilium.io/"
  chart      = "cilium"
  version    = "1.16.2"
  namespace  = "kube-system"

  set {
    name  = "aksbyocni.enabled"
    value = "true"
  }
  set {
    name  = "nodeinit.enabled"
    value = "true"
  }
  set {
    name  = "ipam.operator.clusterPoolIPv4PodCIDRList"
    value = "192.168.0.0/16"
  }
    set {
    name  = "hubble.relay.enabled"
    value = "true"
  }
}
Verifying the Cilium Installation
Now that the AKS cluster is up and running, we need to confirm that Cilium is installed correctly. To do this, you can examine the status of your workloads either through the Azure portal or by connecting directly to the cluster.
Make sure cilium-operator and hubble-relay are running.
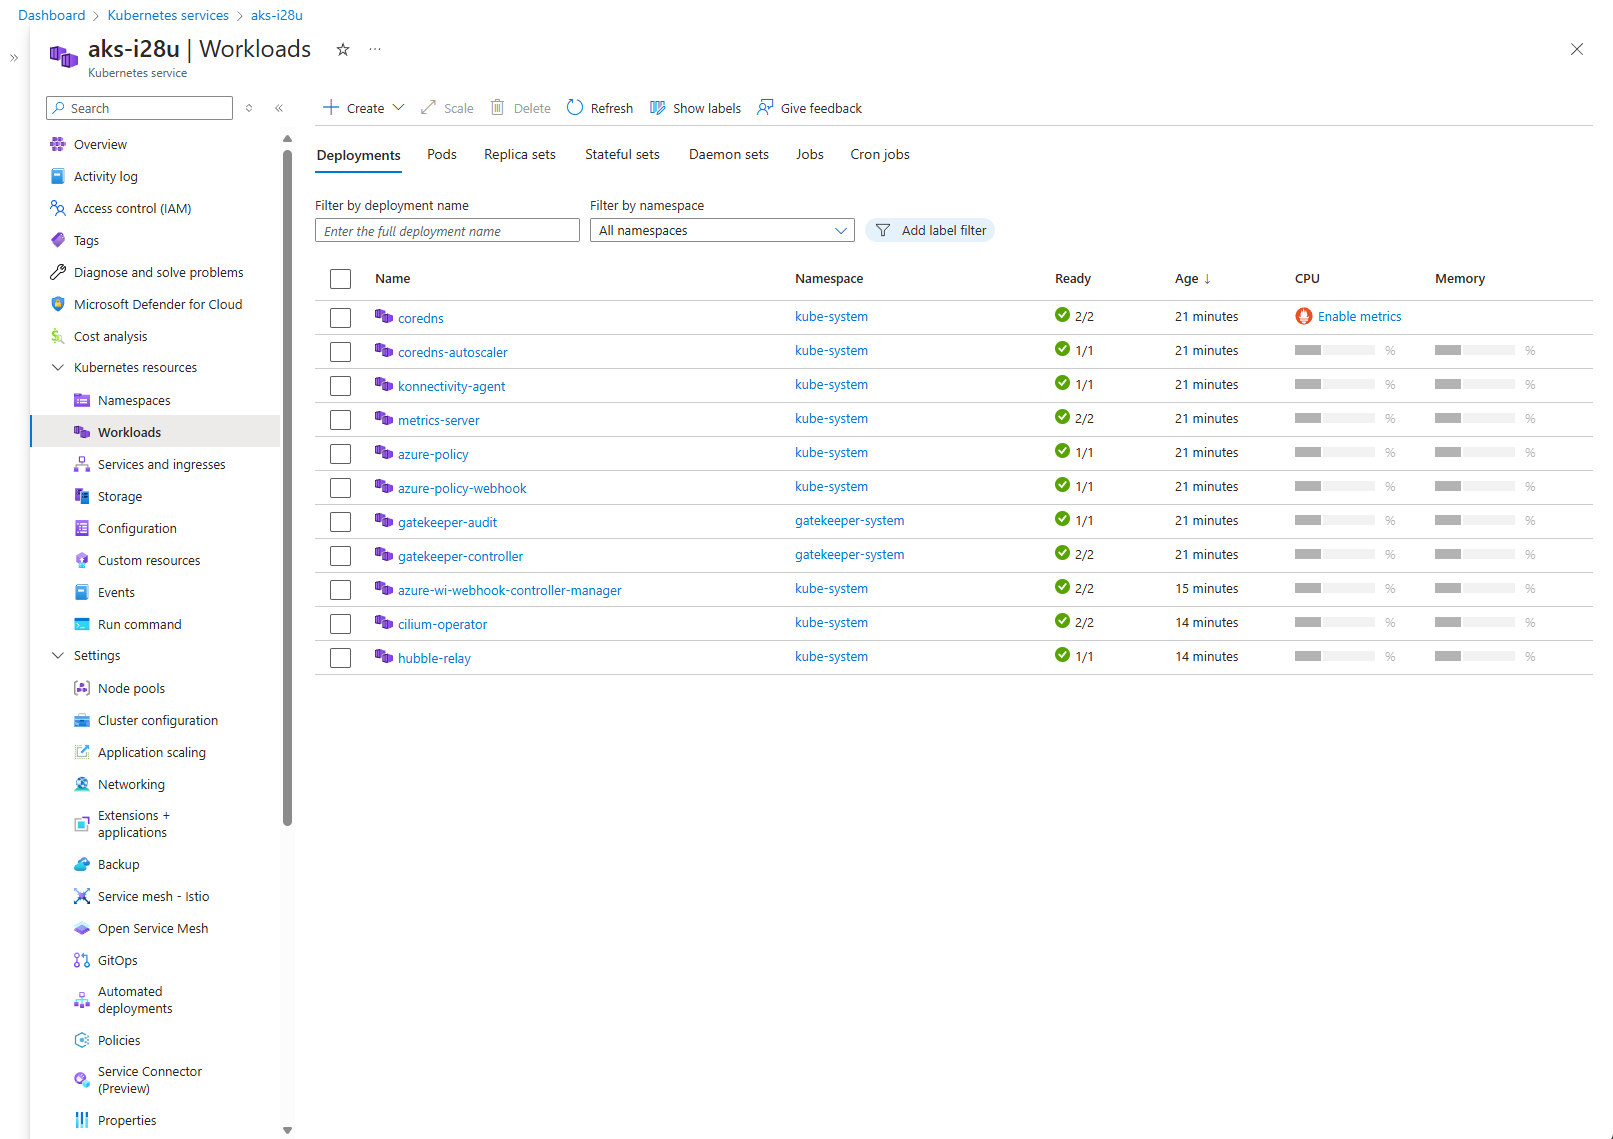
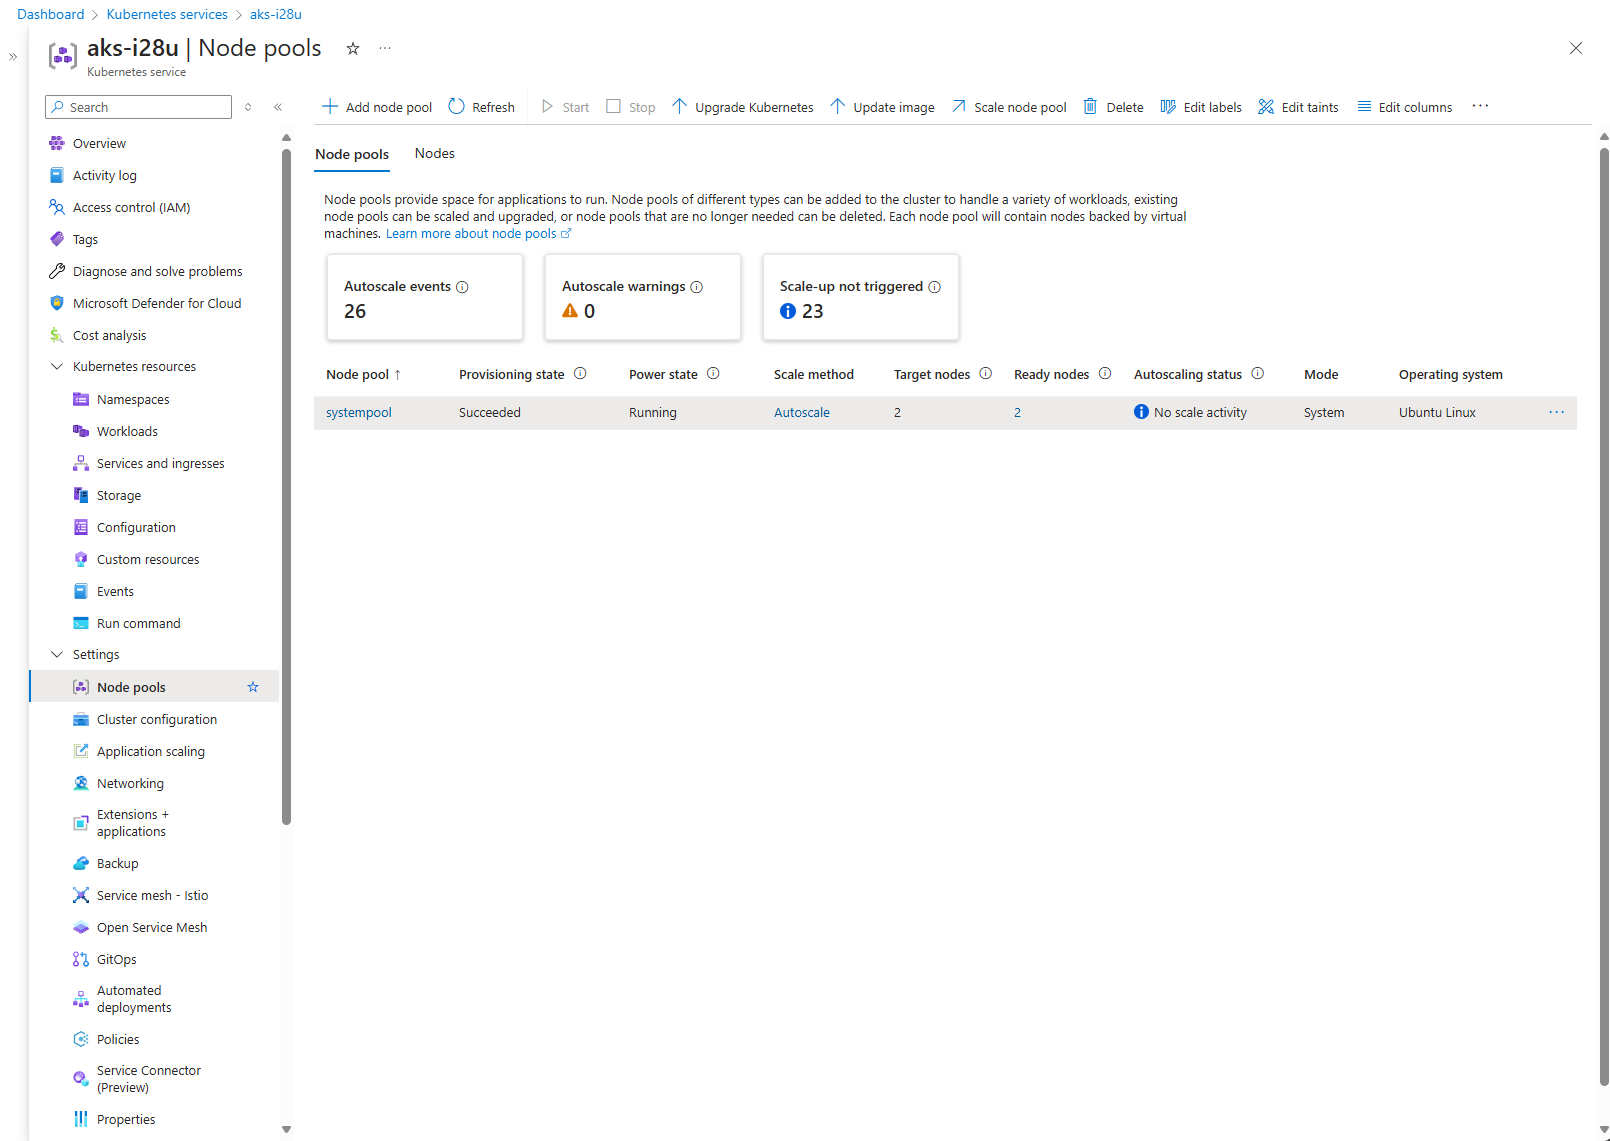
Note: You’ll notice on the Azure portal that your AKS cluster is automatically scaling to at least two nodes. This is because Cilium requires a minimum of two nodes to handle failover and redundancy, which is crucial for maintaining network stability and reliability.
Cilium Installation Validation:
Connect to your cluster: Use the Azure CLI or your preferred method to connect to your AKS cluster.
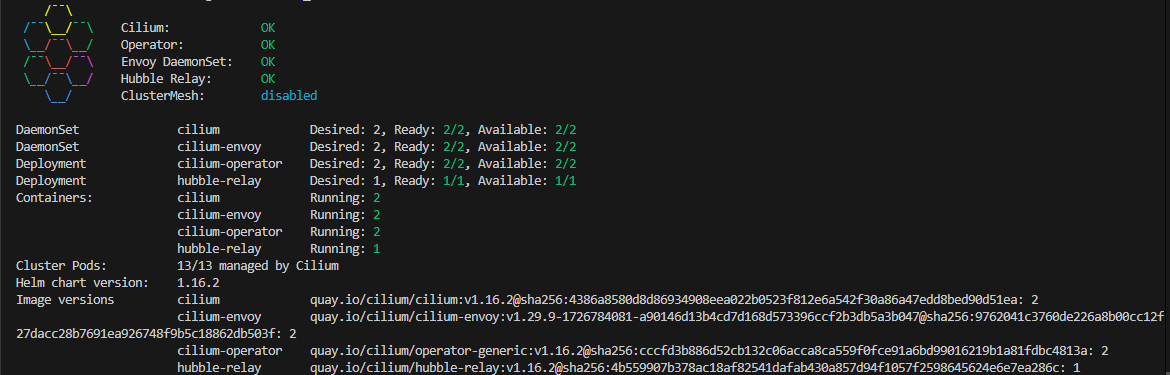
Validate Cilium: Once connected, use the Cilium CLI to check the status of the Cilium installation:
1
cilium status --wait
This command will wait until Cilium is fully operational and report its status. The output should look as below:
Connectivity Test (Optional):
To perform a comprehensive test of network connectivity within your cluster, you can run:
1
cilium connectivity test
This command will run various network tests to ensure that pods can communicate with each other and with external services as expected.
🎉 Congratulations! You’ve successfully deployed a Kubernetes cluster with Cilium, providing a robust and secure foundation for your applications .